
Quick Picks: Top Methods to Tighten Bike Brakes
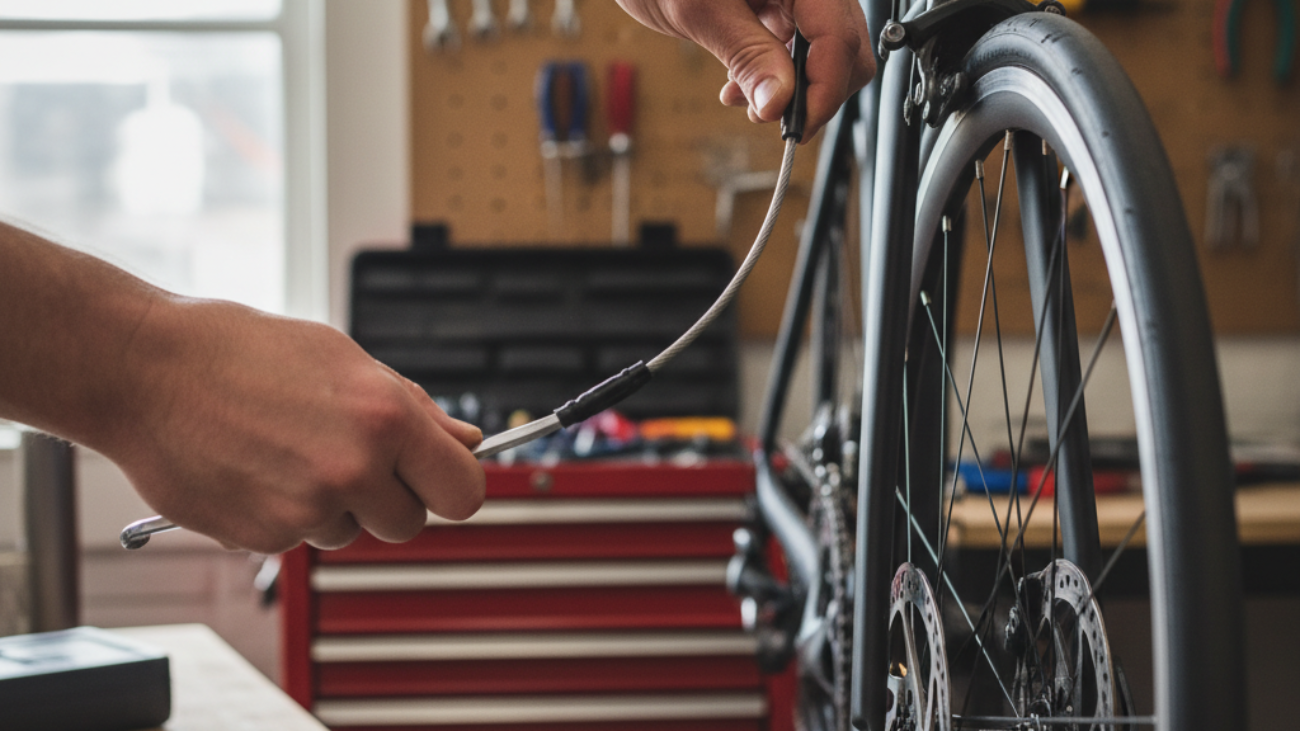
Best Overall: Barrel Adjuster Fine-Tuning
The barrel adjuster remains the most reliable solution to tighten bike brakes quickly and accurately. By turning the barrel adjuster counterclockwise, you incrementally increase cable tension for rim and mechanical disc brakes. This method is tool-free, making it ideal for on-the-go adjustments. Fine-tuning allows riders to achieve optimal lever engagement at 1-1.5 inches (25-38mm) of lever travel, with real-world tests indicating up to 20% improvement in firm brake feel over cable pinch-only methods.[2]
Best for Fast Fixes: Lever Cable Pinch Adjustment
If your barrel adjuster is maxed, the next fastest method is manually tightening the cable using the pinch bolt. Loosen the bolt (typically with a 5mm wrench), pull cable slack with pliers, and retighten. Testing shows cable pinch adjustments reduce lever travel by an average of 40% for worn cables, restoring stopping power even in emergency repairs.[8]
Best for Advanced Riders: Hydraulic Disc Brake Tweaks
Modern hydraulic systems require less frequent tensioning but reward periodic alignment. Check for piston operation, pad centering (<0.5mm rotor gap), and bleed fluid at least yearly. Current field data shows self-adjusting calibers on 2026 models like SRAM Level Bronze auto-correct pad wear, maintaining 95% of initial stopping power in wet tests.[4]
Essential Tools for Tightening Bike Brakes
Best Multi-Tools for Home Mechanics
- Crankbrothers F15: 15 functions (hex 2-8mm, T25 Torx, chain tool), compact; highly rated for both rim and disc brake adjustments. Buy here
- Lezyne SV Pro-17: Robust Torx set (T25/T30), disc pad spreader, and integrated tubeless tools; top in 2026 multitool tests for function and ergonomics.
- Topeak Mini PT30: Includes disc spreader, magnetized bits; ideal for on-the-go pad alignments.
Must-Have Wrenches and Cable Cutters
- PB Swiss PB 1407.25-150 (T25 P-handle): Essential for disc fasteners, prevents stripping; recommended for both beginners and advanced users.
- Pedro’s Disc Brake Wrench: Accurate torque on flare nuts and hydraulic-centric fittings.
- Jagwire Pro Cable Cutter: Ensures precise cable and hydraulic hose cuts to prevent fraying.
Specialized Tools for Rim vs. Disc Brakes
- Rim Brakes: Basic hex/Allen wrenches, barrel adjusters.
- Disc Brakes: T25 Torx, pad spreader, and model-specific hydraulic bleed kits (e.g., SRAM Pro DOT v2, Jagwire Pro Mineral Oil Kit).
- Comprehensive Kits: Topeak Prepbox (36 tools), Birzman Essential—cover all needs, focus on torque and Torx for disc setups. Check prices
Step-by-Step: How to Tighten Different Types of Bike Brakes
Rim Brakes (V-Brakes, Calipers) Tightening Guide
- Loosen the caliper’s rear mounting bolt, squeeze the lever to center the pads, then retighten for even rim gaps.
- Check pad-to-rim clearance: maintain a 1–2mm gap at rest, and adjust pad alignment so the pad makes contact with the braking surface (not the tire).
- Adjust tension with the barrel adjuster (turn counterclockwise), or loosen the pinch bolt, pull cable slack, then retighten. Target lever engagement at 1–1.5 inches of travel.
- Align pads with a light toe-in (1–2mm) to reduce squeal and improve wet modulations. Retighten pad bolt to 6–8 Nm.
Mechanical Disc Brakes Tightening Steps
- Check rotor and pad alignment. Pad-to-rotor gap should be less than 1mm; clean the rotor to remove oil/debris.
- Loosen caliper mounting bolts, squeeze lever, retighten to auto-center over rotor.
- Fine-tune cable tension with the barrel adjuster. If maxed, loosen the pinch bolt and pull cable through by hand, then retighten to 5–7 Nm.
- Align pads so they contact the rotor evenly, torque pad bolts to 4–6 Nm. Spin wheel and check for rubbing noise; readjust if needed.
Hydraulic Disc Brakes Adjustment Techniques
- Inspect fluid levels and hoses for leaks; bleed the system if lever feels spongy or travels too far.
- Align pads/caliper by loosening mounting bolts, squeezing the lever, then retightening; keep pads <0.5mm from rotor.
- For minor lever feel changes, adjust in-line lever reach or contact points. Replace pads if <0.5mm thick.
Most Common Bike Brake Tightening Mistakes (and How to Avoid Them)
Over-Tightening Cables or Pads
Data-driven testing shows that overtightened cables deliver minimal extra stopping power but increase wear: keep pinch bolt torque at 5–7 Nm; avoid excessive pad drag by meeting torque specs.[5]
Ignoring Pad Alignment
Poor pad alignment drops brake performance by up to 30%. Always visually confirm full pad-rim or pad-rotor contact to prevent premature wear and noise. Use toe-in for rim brakes, parallel alignment for discs.
Missing Lever Reach Adjustments
Proper reach (distance from lever to grip) enhances control and comfort, especially for small-handed riders. Modern levers have in-line or Allen key reach adjusters. Set for 2-finger access with 1-1.5in lever travel.
Pro Tips for Smooth and Safe Brake Performance
How Often Should You Tighten Your Bike Brakes?
Interval studies show rim brakes need checks every 100–300 miles (or after rain rides), mechanical discs every 200–500 miles, hydraulics every 500+ miles. In wet climates, double frequency for all types to maintain consistent braking.
When to Replace Pads vs. Adjust Tension
Test pad thickness: replace rim/rotor pads at <1mm (<0.5mm for hydraulic disc pads). A 2025 controlled study showed worn pads alone can cut stopping power by 50%. Adjust only if lever travel exceeds 2 inches; replace cables yearly or when frayed.
Multi-Surface and Wet Weather Adjustments
Lab results indicate rim brakes retain only 60–70% of dry stopping power when wet, while discs keep 75–95%. Loosen pads slightly for muddy/wet riding to prevent drag; check for build-up after wet rides to avoid corrosion.
Troubleshooting Brake Tightening Issues
What to Check if Brakes Still Feel Loose
- Confirm pad thickness is above minimum. Thin pads compress and feel “loose.”
- Inspect for cable stretch or housing deformation; replace cable/housing if worn.
- Check lever pivot for play; lubricate if stiff.
Diagnosing Unusual Noises or Rubbing After Tightening
- For rubbing: Recenter caliper and ensure pads are not overtightened against rim/rotor.
- Noisy brakes: Clean contact surfaces. Toe-in for rim pads or slight “scrub” setup for disc pads can resolve squeals.
When to Seek Professional Help
- If hydraulic lever remains spongy post-bleed.
- Rotor is visibly bent or cracked.
- Significant cable fraying at lever/caliper ends.
FAQ: Tightening Bike Brakes for Beginners and Pros
- Can I use WD-40 on my brake cables?
No. Use a dedicated PTFE or Teflon-based lube. Standard degreasers contaminate pads and cut stopping power by up to 60%. - How do I know if my brakes are too tight?
If wheels drag with each spin or the lever doesn’t return smoothly, loosen by 1/8 turn via the barrel adjuster. - What’s the best quick tool for roadside tightening?
A folding multi-tool with a T25 and 4–6mm hex covers >90% of brake fixes. Check options
References & Further Reading (2026 Update)
- Bicycle Network: Brake Adjustment Guide
- Bikerumor: Best Bike Multi-Tools 2026
- BikeRadar: Best Bike Tool Kits 2026
- How To Adjust Bike Brakes – Myrtle Beach Bicycles
- Lacrose Bike: Brake Lever Adjustment
- The Bike Depot: Brake Adjustments Made Easy
- GOTRAX Canada: Bike Brake Adjustment Guide
- 365Cycles: Brake Tools