
Introduction: Why Learning How to Unscrew Bike Pedals Matters
Knowing how to unscrew bike pedals is an essential skill for anyone interested in cycling, bike maintenance, or DIY repairs. It helps you change pedals, do maintenance, or upgrade your bike for better riding. Learning this process builds confidence, saves you money on repairs, and prevents unnecessary damage to your bike. This guide is designed for grade 9 students and anyone new to bike repair. It will show you a safe and effective way to unscrew bike pedals using simple steps.
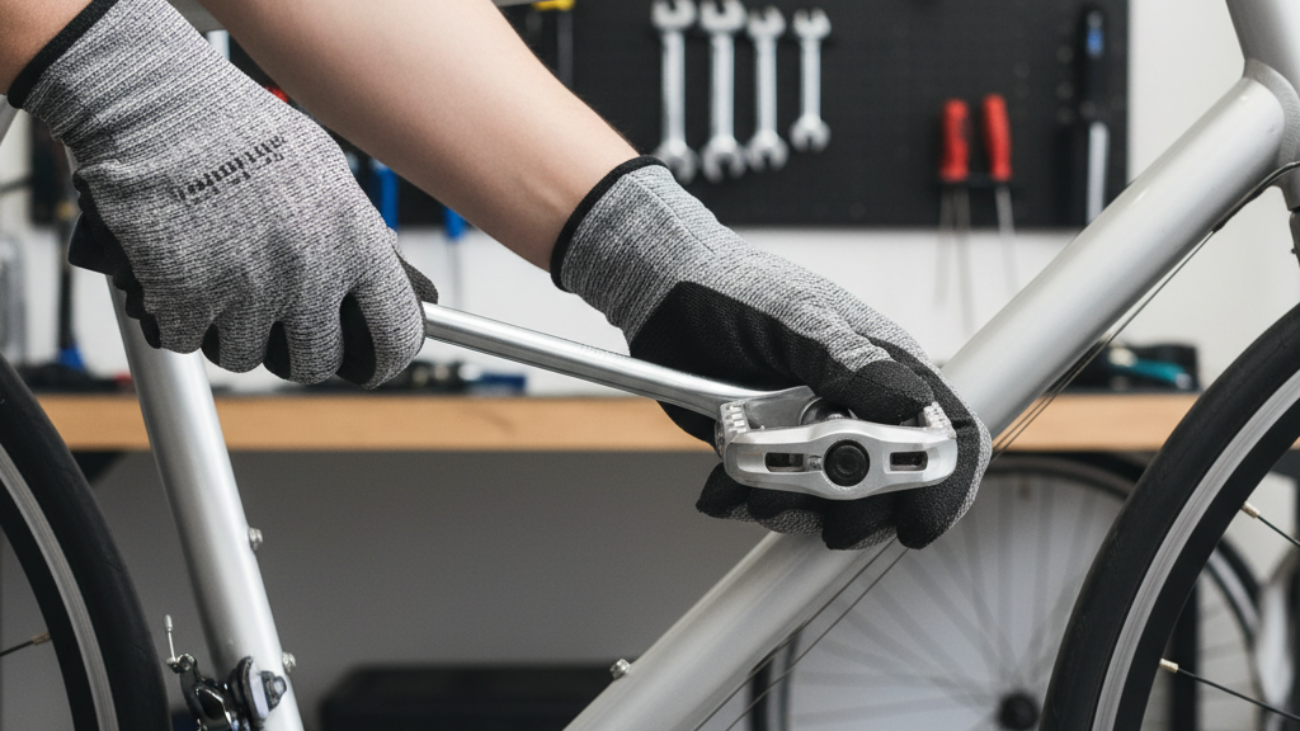
Essential Tools for Unscrewing Bike Pedals
Standard Tools You’ll Need
- 15mm pedal wrench or spanner
- 6mm or 8mm Allen key (hex wrench)
- Work gloves for safety
- Cotton rags or towels
Alternative Tools and DIY Solutions
- Adjustable (crescent) wrench if you do not have a pedal wrench
- Regular household wrench in the right size
- Large spoon wrapped in cloth (for emergency DIY use)
Tool Safety and Workspace Preparation
- Choose a flat, clean workspace with good lighting
- Wear gloves to protect your hands from sudden slips
- Stabilize your bike with a bike stand or lean it carefully against a wall
- Keep your tools within easy reach to avoid distractions
Understanding Pedal Threads and Direction
Right vs Left Pedal Explained
Bike pedals have different threads on each side. The right (drive-side) pedal screws in clockwise and unscrews counterclockwise. The left (non-drive-side) pedal is the opposite—it screws in counterclockwise and unscrews clockwise. This is to prevent the pedals from loosening while you ride.
Common Myths about Pedal Removal
- Myth: Both pedals loosen the same way. (Fact: Left and right pedals loosen in opposite directions.)
- Myth: Pedals always come off easily. (Some may be stuck due to tight installation or rust.)
Step-by-Step Guide: How to Unscrew Bike Pedals
1. Positioning the Bike for Maximum Leverage
- Place your bike on a stable surface or use a bike stand.
- If no stand is available, lean the bike against a wall with the pedals facing out.
- Shift the chain to the largest chainring to protect your hands from sharp teeth.
2. Removing the Right (Drive-Side) Pedal
- Fit the pedal wrench or Allen key onto the right pedal axle (at the crank arm).
- Turn the tool counterclockwise to loosen. Remember: “Left to loosen” on the right side.
- If the pedal is tight, push the wrench with your palm while pulling on the crank with your other hand. You can also stand on the wrench carefully for more force.
- Once loosened, finish unscrewing the pedal by hand.
3. Removing the Left (Non-Drive-Side) Pedal
- Fit your wrench or Allen key onto the left pedal axle.
- Turn the tool clockwise to loosen. Remember: “Right to loosen” on the left side.
- Use controlled force, similar to the right pedal, to prevent slips.
- After the pedal loosens, remove it by hand.
4. Handling Different Crank and Pedal Types
- Some pedals need an Allen key inserted at the end of the axle rather than a wrench. Check pedal design.
- Certain modern bikes or e-bikes may use different sizes of Allen keys. Always check your manufacturer’s instructions.
Troubleshooting Stuck or Rusted Bike Pedals
Diagnosing Why a Pedal Won’t Budge
- Is the pedal installed backwards or overtightened?
- Are threads rusty or gummed up with old grease?
- Have you used the correct direction for loosening?
Lubricants, Penetrants, and Heat Tricks
- Apply a few drops of lubricating oil or a penetrating spray (like WD-40) to the pedal threads.
- Let the oil soak for 10-15 minutes, or longer for heavy rust.
- If the pedal remains stuck, briefly heat the crank arm near the pedal threads with a hair dryer. Heat can help loosen rust.
When to Seek Professional Help
- If pedals remain firmly stuck after trying lubricants and leverage, do not force them—this can damage your crank arms.
- Visit a professional bike mechanic for help. They have special tools and experience for tricky pedal removal.
How to Unscrew Bike Pedals Without Special Tools
DIY Methods Using Household Items
- Wrap the pedal axle in a thick cloth for grip.
- Use a large adjustable wrench if you don’t own a pedal wrench.
- If you have no wrench, use a thick wooden spoon or metal rod, carefully turning the pedal axle in the correct loosening direction.
- Always take your time to avoid slips or rounding the pedal flats.
Safety Precautions for Improvised Techniques
- DIY removal can damage pedals or crank arms if not done carefully.
- Make sure to use slow, steady force rather than sudden jerks.
- Keep your hands and fingers away from sharp chainrings.
Avoiding Common Mistakes When Unscrewing Bike Pedals
Preventing Crossthreading and Damage
- Only use the correct size wrench or Allen key for your pedals.
- Always loosen in the correct direction (right pedal: counterclockwise, left pedal: clockwise).
- Do not force the pedal at a strange angle. This can strip or cross-thread the crank arms.
Protecting Yourself from Injury
- Wear gloves to prevent cuts if your hand slips.
- Push or pull the tool in a way that your hand won’t hit sharp surfaces if it slips.
- Do not use bare hands on greasy or dirty pedals; use a rag for extra grip and safety.
Preparing Pedals and Cranks for Reinstallation
Cleaning and Inspecting Threads
- After unscrewing, wipe all threads on pedals and crank arms clean with a rag.
- Check threads for wear, dirt, or damage.
- Replace any pedals or cranks with visible thread damage for safety.
Greasing and Anti-Seize Tips for 2026 Bike Maintenance
- Before reinstalling pedals, apply a small amount of fresh grease or anti-seize compound to all threads.
- This prevents rust and makes future removal easier.
- Do not overtighten—follow the “snug, not forced” rule to protect threads.
Pro-Level Tips and Hacks for Easier Pedal Removal
Advanced Leverage Techniques
- If the pedal is stubborn, use a longer wrench or a pipe slipped over your wrench handle for more leverage.
- For hard-to-reach pedals, remove the crank arm from the bike to work more easily on a bench.
Advice from Bicycle Mechanics
- Always start by attempting removal with gentle, controlled force.
- Keep a habit of greasing threads before every pedal installation—even pros do it!
- Mark your right and left pedals with permanent marker or tape to avoid confusion during reinstallation.
Special Considerations for E-Bikes, Kids’ Bikes, and Unusual Pedals
Modern Pedal Designs in 2026
- Some e-bikes use special pedals with unique sizes—check your manual or look for markings on the pedal axles.
- Kids’ bikes sometimes have plastic pedals, requiring less force to remove—do not overtighten during reinstallation.
Manufacturer-Specific Tips
- If your bike is made by a specialty brand, always check for specific instructions online or in your bike manual before removing pedals.
- Certain clipless or hybrid pedals may need unique tools or methods; check with the manufacturer’s website.
Frequently Asked Questions About Unscrewing Bike Pedals
- What if my pedal won’t turn at all? Try lubricating the threads and using more leverage. If it fails, get professional help.
- How do I know which pedal is left or right? Look for “L” or “R” stamped on the pedal or axle. The left pedal is on the non-drive side (opposite the chain).
- Can I reuse old pedals? Yes, if the threads are clean and undamaged.
- Do I need special grease? Use any good bicycle grease or anti-seize compound for pedal threads.
- How tight should new pedals be? “Snug” by hand, then a solid further turn with the wrench, but never forced.
Resources & Further Reading: Bicycle Maintenance in 2026
- Sheldon Brown’s Guide to Pedals
- Park Tool: Pedal Removal & Installation
- Bicycles Stack Exchange – Bike Repair Q&A
- Check your bike manufacturer’s website for the latest user manuals and safety advice