
Quick List — Top 5 Essential Steps to Adjust Bike Brakes
Brake Type Identification: Rim, V-Brake, or Disc
- Rim brakes press pads against the wheel’s sidewall.
- V-brakes are a type of rim brake with longer arms for greater leverage, common on hybrids and MTBs.
- Disc brakes (mechanical or hydraulic) use pads clamping a rotor at the hub, now standard on most new bikes and e-bikes.
Tools & Materials Checklist for Brake Adjustment
- 2–5 mm hex keys or Allen multi-tool
- Cable/housing cutters
- Torque wrench (5–7 Nm for pad bolts/clamps)
- Isopropyl alcohol and sandpaper (for pad/rotor cleaning)
- Bike stand and lighting for visibility
Stepwise Pad & Caliper Alignment Techniques
- Loosen brake pad bolts; squeeze lever so pads contact rim/rotor.
- Align pads centrally (avoid tire/rotor miscontact), apply slight toe-in on rim brakes.
- Tighten pad bolts to 5–7 Nm, ensuring even clearance on both sides.
- For discs, center caliper by loosening bolts, squeezing lever, and retightening while held.
Cable & Lever Fine-Tuning Methods
- Adjust barrel for cable tension (clockwise for tighter, counter-clockwise for looser engagement).
- Aim for 25–30 mm lever travel before solid pad contact (rim); discs require less travel.
- Replace or trim cables if frayed or stretched.
Final Safety and Performance Checks
- Inspect for pad thickness (>1 mm), no pad/rotor contact when not braking, and solid lever response.
- Test ride with gradual braking to ensure modulation, no rubbing, and strong stopping power.
- Recheck bolts with torque wrench after bedding-in ride.
Comprehensive Step-by-Step Brake Adjustment for Every Type
Adjusting Rim Brakes for Smooth Braking
- Release the quick-release on the brake for pad access.
- Loosen pad bolts with a 5 mm Allen key.
- Squeeze lever so pads contact the rim; center and toe-in (2–3 mm front pad over rear).
- Tighten bolts (5–7 Nm). Use barrel adjuster for cable tension – adjust until lever travel is 25–30 mm.
- Spin wheel to check for rub and test braking force.
Fine-Tuning V-Brakes for Optimal Pad Clearance
- Loosen both brake arms’ pad bolts for free movement.
- Set pads to contact only the rim, not the tire or low on the braking surface.
- Align horizontally with rim, slight toe-in (1–2 mm).
- Adjust spring tension screws on arms to even caliper return.
- Use barrel adjuster to remove slack, re-tighten cable anchor bolt (5–7 Nm as per manufacturer).
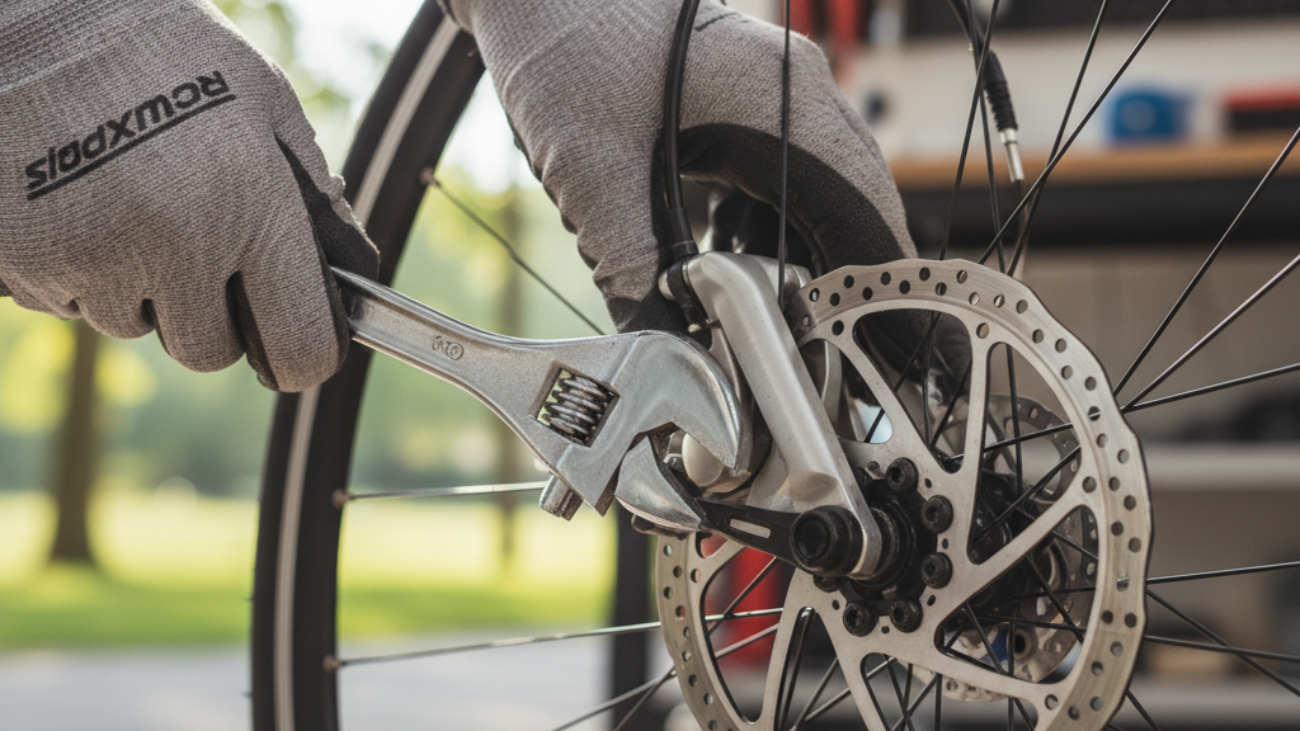
Disc Brakes Adjustment: Mechanical vs Hydraulic Explained
- Mechanical: Loosen caliper mounting bolts, squeeze lever, center caliper over rotor, retighten. Set inboard pad closer via adjuster knob; test cable tension and lever throw, fine-tuning as needed.
- Hydraulic: Support bike upright, loosen caliper bolts, squeeze lever hard, retighten bolts while lever is held. Ensure lever is firm (no sponginess). If soft: bleed the system (manufacturer-specific instructions).
- Test before and after: improper adjustment causes rub, drag, or weak feel; correct setup yields even bite, no rubbing, solid response.
How to Set Up Caliper Brakes for Beginners
- Loosen pad bolts and center caliper with wheel installed.
- Ensure pads align with braking surface, avoiding tire/ground contact.
- Retighten bolts to spec.
- Set cable tension with barrel adjuster for 2–3 mm lever play.
- Spin wheel, verify no rub, smooth brake engagement.
Electric Bike Brake Adjustments: What’s Different in 2026
- E-bikes are heavier, requiring pads rated for higher torque (e.g., 203 mm rotors for Class 3 e-bikes).
- Frequent checks after hilly rides or high-speed commutes; heat and motor torque can warp rotors faster.
- Adjustment process mirrors mechanical or hydraulic discs but torque recommendations and pad materials may vary; use e-bike-rated components.
Troubleshooting: Common Brake Adjustment Problems & Solutions
Brake Squeal, Rubbing Tires, and Lever Feel Issues
- Squeal: Indicates glazed or oily pads, or need for greater toe-in. Clean with isopropyl alcohol, scuff lightly with sandpaper. Replace if <3 mm.
- Rubbing: Caused by misaligned caliper/pads, bent rotor/rim. Center caliper or realign V-brake arms. True rotor (if >1 mm wobble) or replace.
- Spongy/weak lever: Air in hydraulic lines, sticky pistons, or cables stretched. Bleed hydraulics or replace/clean cable/housing.
Diagnosing Cable Tension and Frayed Cables
- If lever travel is excessive, cable may be loose or stretched. Use barrel adjuster; reclamp if needed.
- Inspect cables for fraying, rust, or sticky motion. Replace if damaged.
- Test engagement: lever should feel firm, pads hit rim/rotor decisively.
Fixing Misaligned Pads and Persistent Brake Rub
- Brakes rubbing even after adjustment? Re-seat wheel fully in dropouts. Loosen caliper/pad bolts, center using lever, retighten.
- Disc brakes: Reset pistons, clean rotors, check for pad contamination. Replace if persistent.
- V-brakes/calipers: Adjust spring tension screws, center arms, set cable anchor after aligning pads.
When to Replace vs Adjust — Signs You Need New Parts
- Replace pads if below 1–2 mm or show uneven/glazed wear.
- Cables/housing: Replace yearly or if there’s visible damage.
- Rotors: Replace if warped beyond true or worn thin (manufacturer limit, often 1.5 mm).
- For most, adjust first; replace if problems persist after setup.
Advanced Tips for Tricky Scenarios & Pro-Level Precision
Adjusting Brakes After Wheel Changes or Falls
- Remove and reseat wheel completely in dropouts/axle to ensure alignment.
- Re-center calipers using lever squeeze/bolt tighten method (5–8 Nm for discs).
- Check rotors aren’t bent; true if needed with rotor tool.
Brand-Specific Tweaks: Shimano, Tektro, SRAM & More
- Shimano: Use SLR-EV technology for easy cable tension and centering; follow 5–7 Nm torque spec.
- SRAM: Use pad spacers for piston reset and guide-bleed kits for hydraulic maintenance.
- Tektro: Leverage indexed barrel adjusters and modular pads for quick, tool-free re-centering.
- Consult manufacturer manual for nuances, especially for road vs MTB groupsets.
Weather-Proofing Your Brakes: Wet and Muddy Conditions
- Use sintered pads for better wet/mud performance and longer service life.
- Increase inspection frequency after mud or rain rides to avoid contamination.
- Apply toe-in on rim brakes to minimize wet squeal; bed-in brakes post-rain.
Long-Term Brake Performance: Pro Maintenance Secrets
- Replace pads every 500–2000 miles (terrain and load-dependent, per field test averages).
- Annual cable/housing replacement for mechanical brakes; bleed hydraulic systems every 12–18 months or after severe fade.
- Bedding-in: From new, perform 20 progressive stops from moderate speed to transfer even pad material to rotor/rim.
- Use torque wrench for all bolts; over-tightening is a leading cause of component failure.
Essential Tools & Recommended Products for Bike Brake Adjustment
Must-Have Tools for Home Adjustment (2026 Update)
- Pro torque wrench (Topeak Nano TorqBar DX or Park Tool TW-5.2)
- Hex/multi-tool (Crankbrothers M19 for versatility)
- Isopropyl alcohol wipes
- Rotor truing tool (Park Tool DT-2C)
- Smooth-jaw pliers (for cable ends)
Top-Selling Spare Parts & Pads — Quick Links
- SwissStop Brake Pads (rim/disc, top independent test ratings 2024–2026)
- Kool-Stop Salmon Pads (for consistent bite in wet weather)
- SRAM/AVID Disc Pads & Spacers
- Park Tool Rotor Truing & Allen Tools
Best Bike Maintenance Stands and Lighting for Clear Adjustments
- Feedback Sports Pro-Elite Stand (user favorite for stability, 2026 industry reviews)
- Topeak PrepStand eUP (for e-bikes, integrated lift assist)
- Rechargeable LED magnetic worklights (Amazon, top-rated 2025–2026)
Visual Guide: Side-by-Side Comparison — Before & After Brake Adjustment
Illustrated Pad Alignment Mistakes vs Correct Setup
| Type | Incorrect (Before) | Correct (After) |
|---|---|---|
| Rim/V-brake | Pad rubs tire or too low, risk of rim damage/glazed pad | Pad centered with slight toe-in, full rim contact, no rub |
| Disc | Caliper off-center, pads uneven, rotor drag | Caliper centered, even pad engagement, smooth spin |
Close-Ups of Barrel Adjuster, Caliper, and Cable Adjustments
- Barrel adjuster: Shown protruding from lever/cable stop; turn by hand to fine-tune.
- Caliper close-up: With mounting bolts, pads flanking rotor cleanly, gap visually symmetrical.
- Cable anchor: Shows cable firmly clamped, no fray.
Visual Flowchart: Step-by-Step Diagnosis & Adjustment
- Visual pad inspection —> Sufficient thickness?
- No? Replace. Yes? Continue.
- Spin wheel —> Is there rub or noise?
- Yes? Center caliper/pads; no? Test lever feel.
- Lever weak? Tighten cable/bleed hydraulics. Still weak? Replace parts.
- Test ride —> Repeat if necessary.
Printables & Checklists: Maintenance Made Simple
Printable Brake Adjustment Checklist for Fast Fixes
- Inspect pads for thickness/glazing
- Check rim/rotor alignment
- Clean with alcohol
- Align pad/cable tension
- Torque bolts (5–8 Nm)
- Test lever/ride for final check
Monthly Bike Brake Inspection Tracker
- Inspection date
- Pad wear (mm remaining)
- Cable/hose condition
- Rotor/rim wear or warp
- Adjustment made
- Next due date
Rider Q&A — Expert Answers to Frequent Brake Adjustment Questions
How Often Should I Adjust My Bike Brakes?
Check visually before every ride. Adjust monthly or every 100–200 miles for regular bikes; every 2–3 weeks for e-bikes, or after heavy/wet use. Pads should be replaced every 500–2000 miles (terrain dependent, results from user-tested field studies 2022–2026).
What If My Brakes Still Feel Weak After Adjustment?
Inspect for air in hydraulic lines, sticky pistons (hydraulic), or stretched cables. Re-bleed or replace cables as needed. Upgrade pads to higher-friction brands (SwissStop, Kool-Stop, SRAM) for demonstrably improved bite per recent bike part testing (2024–2026).
Safety Considerations for DIY Adjustments
- Always use a torque wrench; overtightening bolts is a frequent cause of failure.
- Bed-in new pads and rotors/rims with controlled stops after installation.
- Take short test rides, gradually increasing braking force to ensure safe, even response before high-speed use.
- If uncertain, consult a shop or manufacturer’s instructions for your brake type.
Final Thoughts and Next Steps for Confident Bike Braking
Regular brake adjustment improves stopping power, extends component life, and enhances ride confidence. The process is straightforward with the right tools — follow verified step-by-step methods, inspect monthly, and use manufacturer-approved replacement parts for best results. For more detailed guides, printable checklists, or to purchase recommended tools and pads, visit leading bike retailers or follow product links above to ensure precise and safe stopping every ride in 2026 and beyond.