
Understanding Bicycle Pedals and Tools Needed
Types of Bicycle Pedals (Flat, Clipless, Platform, Kids’ Bikes)
If you want to learn how do you remove bicycle pedals, start by knowing which type of pedals your bike has. Most bikes use one of these four common types:
- Flat Pedals: Simple, basic pedals with a flat surface. Most kids’ and city bikes have these.
- Clipless Pedals: Used for road and mountain bikes. You “clip” cycling shoes into them for better control.
- Platform Pedals: Wider, flat pedals that may have pins for better grip. Popular on mountain or BMX bikes.
- Kids’ Bike Pedals: Usually smaller and made from plastic. Easier to remove due to light materials.
Each pedal type attaches in a similar way but may need slightly different tools.
Choosing the Right Removal Tools (15mm Wrench, Allen Keys, Others)
Before you remove bicycle pedals, gather these tools:
- 15mm Pedal Wrench: Fits most adult bike pedals. It’s thin and long for extra leverage.
- 6mm or 8mm Allen Key: Some pedals have a hexagonal hole for these instead of flat sides.
- Lubricating Oil or Penetrating Spray: Helps loosen stuck pedals.
- Shop Towel: To clean grease and protect parts.
Safety Gear and Workspace Preparation
Your safety matters when you remove bicycle pedals! Always:
- Wear gloves to protect your hands from cuts and grease.
- Use safety goggles if you’re using sprays.
- Set up your bike on a firm, flat surface. A bike stand helps, but it’s not required.
- Keep your workspace clean and have all tools within reach.
Step-by-Step Instructions: How to Remove Bicycle Pedals
Positioning Your Bike for Pedal Removal
- Rest your bike upside down, or use a bike stand if you have one.
- Make sure the pedals are easy to reach and stable.
- If the pedals are close to the ground, shift the cranks so the pedal you’re working on is at 3 o’clock or 9 o’clock.
Identifying Right vs. Left Pedal Threads
Each pedal is marked as R (right/drive side) or L (left/non-drive side). This is important because:
- The right pedal tightens clockwise and loosens counterclockwise.
- The left pedal tightens counterclockwise and loosens clockwise. This is known as a “reverse thread.”
Check the ends of the pedal axle for these markings before starting.
Step 1 – Removing the Right (Drive Side) Pedal
-
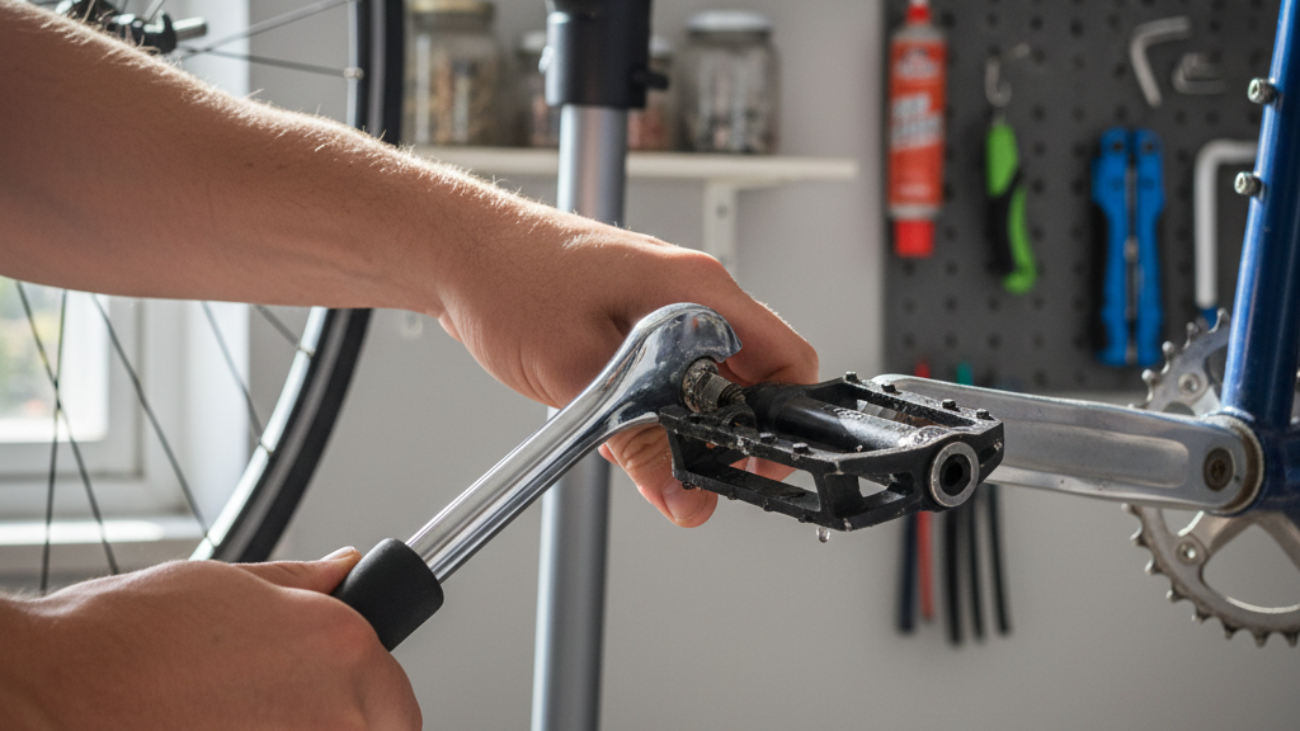
Place the correct wrench (15mm pedal wrench or Allen key) on the right pedal axle.
-
Turn the wrench counterclockwise (to the left) to loosen. If it’s tight, use your body weight to push down safely.
-
Once loose, spin the pedal out by hand. Keep parts clean for later installation.
Step 2 – Removing the Left (Non-Drive Side) Pedal
-
Set your wrench on the left pedal axle (marked L).
-
Turn the wrench clockwise (to the right) to loosen the left pedal—remember it’s a reverse thread!
-
Spin the pedal off by hand after loosening. Wipe down the threads with a towel.
Pro Tips for First-Time Pedal Removal
- Apply penetrating oil to the pedal threads if stuck, and wait a few minutes before trying again.
- Make sure to turn the pedals the correct way to avoid stripping threads.
- If needed, use a longer wrench for extra leverage, but be gentle.
Troubleshooting Stuck or Seized Pedals
Diagnosing Common Causes (Corrosion, Over-Tightening)
If your pedals won’t come off, the usual reasons are:
- Rust or Corrosion: Water and dirt between pedal and crank arm can cause this.
- Over-Tightening: Pedals installed too tightly can be stubborn to remove.
- Cross-Threading: If the pedal threads aren’t lined up, they will not loosen easily.
Stuck Pedal Troubleshooting Flowchart
| Problem | Action |
|---|---|
| Pedal will not turn | Spray lubricant at pedal threads, wait 5 mins |
| Still very tight | Try longer wrench or use a rubber mallet on wrench handle |
| No movement | Apply gentle heat with hair dryer to crank arm, then try again |
| Metal bends or cracks | Stop and ask a bike mechanic for help |
Advanced Removal Techniques (Lubricants, Heat, Tools)
- Use a quality penetrating oil and let it soak overnight if needed.
- Warm the crank arm gently with a hair dryer to expand the metal. This can help break the pedal free.
- Always use the correct tool. Improvised tools might damage your bike or hurt you.
When to Seek Professional Help
- If you see metal parts bending, stop immediately.
- Any time you feel unsure, it’s best to ask a bike shop for help to avoid further damage.
Environmental and Safety Considerations
Eco-Friendly Lubrication and Degreaser Disposal
- Use eco-friendly lubricants and degreasers where possible.
- Never pour leftover chemicals down the drain or onto the ground. Check your local recycling center for disposal sites.
Protecting Your Bike and Workspace
- Lay down newspaper or old towels to catch drips.
- Clean tools with a rag, and store them away from children.
- Avoid scratching the bike’s paintwork by keeping tools steady and well-positioned.
Preventative Maintenance for Long-Term Pedal Health
- Remove, clean, and re-grease your pedals at least once a year.
- Check pedal tightness regularly so they never work loose or get stuck.
- If you ride in the rain often, service pedals more frequently.
Reinstalling Pedals: Best Practices for Every Bike
Cleaning and Prepping Pedal Threads
- Clean pedal threads with a shop towel. Remove all dirt and old grease.
- Inspect for damage. Replace pedals or crank if threads are stripped or warped.
Greasing and Installing Pedals Correctly
- Apply a thin layer of bicycle grease to pedal threads. This prevents future rust and seizing.
- Insert pedals straight into crank arm holes. Fingers first to avoid cross-threading.
Correct Torque and Avoiding Cross-Threading
- Tighten pedals until they’re snug—use a torque wrench if possible (about 35-40 Nm).
- Never force a pedal. If it won’t go in easily, unscrew and try again.
Special Tips for Clipless, Platform, and Kids’ Bike Pedals
- Clipless pedals often need periodic maintenance and cleaning. Check manufacturer instructions.
- Platform pedals should spin freely. If not, clean and service internal bearings.
- Kids’ bike pedals are simple but can become loose—check them when reassembling.
Frequently Asked Questions About Removing Bicycle Pedals
Can I Remove Pedals Without Special Tools?
You can remove some pedals with a standard 15mm wrench, but bike-specific pedal wrenches make the job much easier and safer. Don’t use pliers, as they might slip and cause injury.
How Do I Know Which Way to Turn the Pedal?
Remember: “Back off” the pedals. Turn the right pedal counterclockwise, the left pedal clockwise to loosen. Most pedals are marked L (left) and R (right).
What If the Pedals Won’t Budge?
Apply penetrating oil, wait, and try again. Use longer tools for more leverage, or gently apply heat to the crank arms. If all else fails, consult a bike mechanic.
Should I Use Anti-Seize or Grease on Pedal Threads?
Yes, always grease the threads before reinstalling to prevent rust and make removal easier next time. Anti-seize is also good, especially in wet climates.
Additional Resources and Pro-Level Hacks
Video Tutorials and Illustrations
- YouTube has many guides showing how do you remove bicycle pedals step by step—search for your pedal type for the best tips.
- Bike websites often have diagrams to make removal easy to understand.
Trusted Products and Tool Recommendations
- Park Tool and Pedro’s make reliable pedal wrenches and Allen keys.
- WD-40 and Finish Line both offer effective and eco-friendly degreasers.
Expert Tips for Advanced Riders and Unique Bikes
- If you ride often, consider investing in a torque wrench for best results.
- For carbon crank arms, be extra gentle and use only bike-specific grease.
- Replace old or worn-out pedals and keep spare parts handy for quick swaps.
This guide on how do you remove bicycle pedals gives you the essential know-how for any bike. Follow these steps for safe, easy pedal removal, solve common problems, and keep your pedals in top shape. Next time your pedals need replacing or servicing, you’ll have the confidence and skills to do it yourself!