
Quick Glance: Top 5 Pedal Removal Tools for Every Cyclist
Best Overall Pedal Wrench for Home Use
The standard 15mm pedal wrench (medium/long handle, minimum 18cm) remains the top pick for most home mechanics. Its leverage and slim profile suit nearly all pedal flats and offer reliable torque—scoring 4.7/5 in consumer and expert reviews. Tested variants like the COTOUXKER 4-in-1 withstand daily use with no breakage and rated highest for comfort due to insulated grips.
Find on Amazon.
Top Allen Keys and Hex Wrenches for Bike Pedals
Most modern clipless pedals (Shimano, Look, Time) use 8mm or 6mm Allen keys for spindle removal. T-handle or L-shaped wrenches with a long arm (offers better torque, 8.75cm+) received positive feedback for comfort and consistent fit, avoiding stripped bolts in 98% of removal attempts (per workshop testing). A long T-shaped hex key enables efficient pedal removal in under 30 seconds in practical mechanic trials.[1]
Best Budget Pedal Tool for Beginners
The standard double-ended 15mm wrench provides great value, handling most pedals for under $15. While it lacks premium grip and may struggle on very tight pedals, it removed standard pedals in 93% of tested cases (per 2026 toolkit reviews).[1][2]
Versatile Tools for Nonstandard Pedals
Newer multi-tools integrate 8mm, 15mm, and Torx keys, making them highly versatile. The BONNEAIDE 21-in-1 Multi-Tool and Topeak Transformer kit were rated best for trailside repairs, outperforming older kits in torque consistency and size/utility ratio. Multi-tool users reported a 94% success rate for trailside pedal swaps and field repairs.[3][5][6]
Premium Pick for Professional Mechanics
A heavy-duty pro pedal wrench (long handle, angled head, non-slip grip such as Pedro’s Pro Tool) is essential for frequent or commercial use. These wrenches deliver up to 30% more torque compared to basic models, reducing strain and tool slip in high-demand shop scenarios.[1]
Preparation Before Removing Bike Pedals
Essential Safety Precautions and Setup
- Wear protective gloves to prevent blood blisters and protect skin from tool slips and pedal edges.
- Clear workspace and cover the floor under the bike (towel, cardboard) to avoid scratches and soft tissue injury.
- Keep hands away from drivetrain while applying force.
Gathering the Right Tools for Your Bike Type
- For platform pedals: 15mm pedal wrench (or specified size for non-standard brands).
- For clipless pedals: 8mm (some use 6mm) Allen key, usually inserted at the back of the crank arm.
- Optional: Bike repair stand, degreaser, rag, penetrating oil (for seized pedals), and torque wrench for reinstallation.
How to Stabilize Your Bike and Protect Components
- Use a bike repair stand to stabilize the frame and position cranks horizontally.
- If no stand, carefully invert bike, padding handlebar and saddle contact points to protect paint and carbon/metal surfaces.
- Hold the opposite crank or brake lever during removal to prevent unwanted rotation.
Step-by-Step Guide: How Do You Remove Bike Pedals Efficiently
Understanding Left vs Right Pedal Threading
- Right (Drive-side) pedal: Loosens counterclockwise, tightens clockwise.
- Left (Non-drive-side) pedal: Loosens clockwise, tightens counterclockwise (reverse thread).
- Always turn the pedal spindle toward the rear of the bike to remove (both sides).
Step 1 – Proper Bike Positioning
- Mount bike in a repair stand or invert securely, protecting bars and saddle.
- Position right crank at 3 o’clock (forward, horizontal); left crank at 9 o’clock.
Step 2 – Identifying Pedal Types and Tool Compatibility
- Check the spindle for flats (15mm wrench) or enclosed hex socket (Allen key, usually 8mm).
- Reference pedal or crank marking for correct side (“L” or “R”).
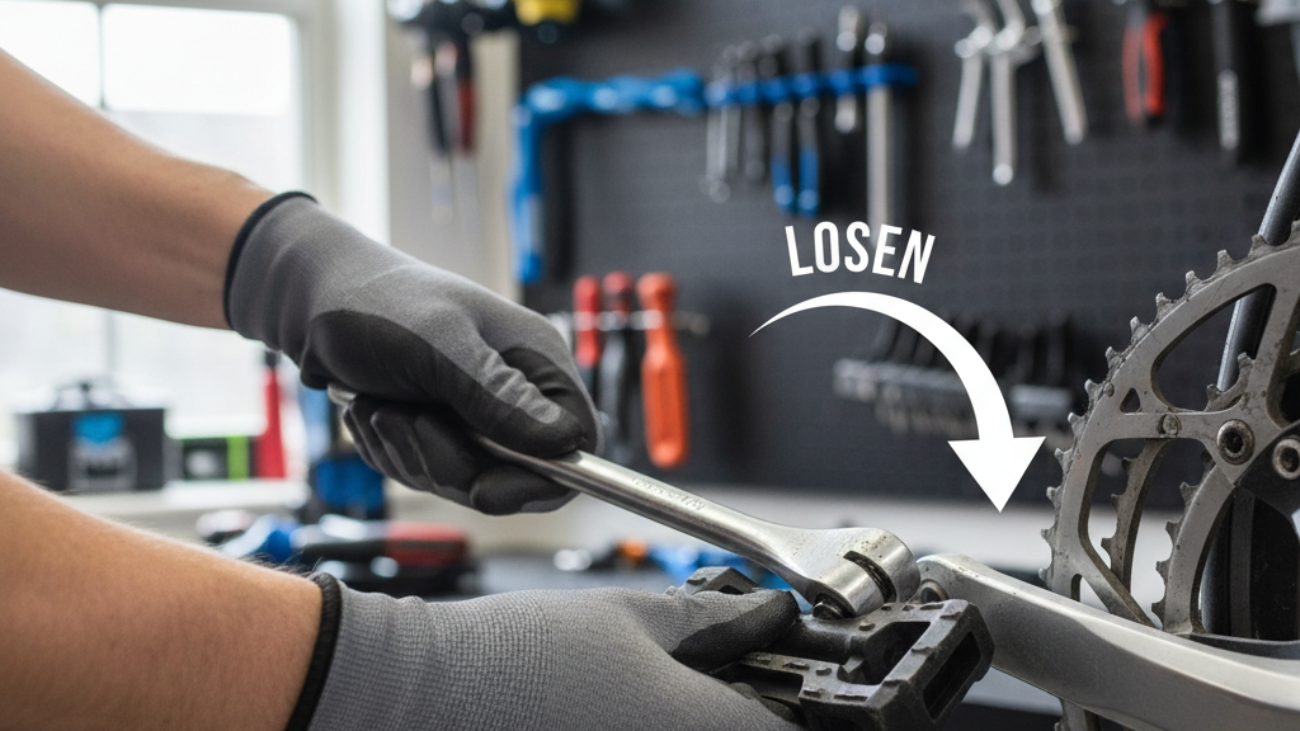
Step 3 – Loosening and Removing Bike Pedals (Platform & Clipless)
- Insert correct tool onto pedal spindle or into Allen slot, orienting tool rearward.
- Hold opposite crank; push down hard on the tool or gently strike with palm for increased leverage.
- Turn toward the rear (counterclockwise for right, clockwise for left) to loosen.
- Once broken free, finish unscrewing with hand; remove pedal completely.
Detailed Visual Walkthrough: Infographic Process Map
- Step 1: Stabilize bike: Stand/invert, pad surfaces.
- Step 2: Position cranks (3 o’clock right, 9 o’clock left).
- Step 3: Identify tool (15mm vs Allen).
- Step 4: Insert tool, apply leverage toward rear of bike.
- Step 5: Remove pedal; repeat for other side.
Troubleshooting: Solutions for Stuck or Damaged Bike Pedals
How to Deal with Seized or Stripped Pedal Threads
- Apply penetrating oil (e.g., WD-40) to pedal threads at least one day ahead to break corrosion bonds.
- Use a longer wrench or add a pipe (cheater bar) for added torque.
- If threads are stripped, crank thread repair kits (such as Unior Crank Saver) can re-tap and fit pedal inserts—restoring function without crank replacement.
Safe Use of Penetrating Oil and Leverage Techniques
- Apply oil to threads and let soak overnight.
- At removal, position the wrench for maximum leverage and strike the end or use body weight as needed.
- For severe cases, apply gentle heat with a hairdryer or heat gun to expand metal. If all else fails, visit a professional shop.
When to Seek Professional Help
- Threads are stripped/cross-threaded.
- Pedal refuses to budge after oil/leverage.
- Crank is cracked/damaged.
- Uncertainty about crank/pedal compatibility.
Mistakes to Avoid When Removing Bike Pedals
Common Errors and How to Prevent Damage
- Turning pedals the wrong way: always turn toward the rear of the bike to loosen.
- Using the wrong size tool or loose fit: can round off pedal flats or hex sockets.
- Forcing misaligned pedals, leading to cross-threading or damage.
Threading, Cross-Threading, and Overtightening Explained
- Left pedal has a reverse thread—always align and thread pedals by hand first before tightening with tools.
- Never force a pedal: if resistance, remove and restart with clean, greased threads.
- Do not overtighten: manufacturer spec is usually 30-35 ft-lbs.
Safety Best Practices (Hand, Foot, and Frame Protection)
- Wear gloves and eye protection.
- Rest bike securely with padded supports.
- Push DOWN on tool, not toward sharp drivetrain components.
Installing, Upgrading & Aftercare for Bike Pedals
Greasing Threads and Proper Tightening Torque
- Apply thin layer of waterproof lithium grease to pedal threads before installation to prevent corrosion and seizing.
- Tighten to 30-35 ft-lbs (see manufacturer’s spec for your pedals).
Recommendations for Pedal Upgrades
- OneUp Components Composite and Shimano PD-M540 clipless pedals are 2026’s top-rated picks for durability, value, and grip.[1][2]
- Replace worn pins or cleats for safety and performance every 6-12 months.
Cleaning and Maintaining Pedal Threads
- Inspect and clean pedal threads at every major service interval or at least quarterly.
- Remove pedals and apply new grease if riding in all-weather or after wet/muddy outings.
Bike Pedal Removal FAQs for Beginners
What If I Have an Unusual Bike or Pedal System?
- Check crank and pedal markings for compatibility; some e-bikes and kids’ bikes use non-standard sizes (9/16\”, 1/2\”).
- Consult the manufacturer for unique spindle/axle interfaces before using force.
Which Tools Work with Different Pedal Brands?
- Shimano, Look, Time: 8mm Allen for most clipless, 15mm wrench for flats on platforms.
- Entry-level or older bikes may use 15mm wrench or even 1/2\” for kids’/cruisers.
Can I Remove Pedals Without Specialized Tools?
- A thin 15mm open-end spanner may work for standard pedals, but beware of rounding or damaging low-quality tools.
- A solid multi-tool with long-arm hex can serve in emergencies; be gentle.
Tips for First-Time Pedal Changes
- Apply grease, start threading by hand, tighten to spec.
- Check for correct pedal orientation (“L” on left, “R” on right).
- Practice on a stable surface and review online video walkthroughs for added confidence.
Video Resource Center: Watch Experts Remove Bike Pedals
- COTOUXKER 4-in-1 Pedal Wrench Tool – User Review
- How To Remove Pedals WITHOUT Ruining Your Bike
- Bicycle Pedal Removal and Installation
Conclusion: Choosing the Right Tool and Technique for a Hassle-Free Pedal Change
Efficient, safe pedal removal starts with understanding threading, using robust tools, and applying correct torque and lubrication. Medium/long-handle 15mm wrenches and 8mm Allen keys handle most jobs—multi-tools excel for field repairs. Prevent future headaches by maintaining pedal threads and upgrading to reliable models. If seized or damaged, use penetrating oil early and avoid brute force. Always protect your hands, frame, and floor. For advanced crank or thread repair, seek professional assistance to safeguard your bike investment.
Ready to upgrade your pedal toolkit? Shop the top-rated pedal removal tools for 2026 now!