
Why Proper Bike Brake Adjustment Matters in 2024
Key Safety Considerations
Proper bike brake adjustment is crucial for your safety. Well-tuned brakes help you stop quickly and avoid accidents. Loose or poorly adjusted brakes can cause crashes or fail when you need them most. In 2024, as bike speeds and traffic increase, having reliable brakes is more important than ever.
Impact on Performance for Road, Mountain, and Hybrid Bikes
Each type of bike needs carefully adjusted brakes. Road bikes need precise stopping power for smooth roads and fast descents. Mountain bikes face mud, debris, and steep trails, making strong brakes essential. Hybrid bikes need reliable brakes for daily commuting and mixed surfaces. Good adjustment helps each bike perform at its best.
Understanding Bike Brakes: Types and Tools You’ll Need
Rim Brakes vs. Disc Brakes: What’s the Difference?
Most bikes use either rim brakes or disc brakes. Rim brakes squeeze pads against the wheel rim to stop you. Disc brakes squeeze pads against a metal disc, or rotor, attached to the wheel hub. Disc brakes come in mechanical (cable-operated) and hydraulic (fluid-operated) versions. Each type needs a slightly different adjustment method.
Tools Checklist for Brake Adjustment (With Visual References)
- Hex (Allen) wrenches, usually 4mm, 5mm, and 6mm
- Phillips and flathead screwdrivers
- Bicycle tire lever (for removing wheels if needed)
- Needle-nose pliers
- Cable cutters (for trimming brake cables)
- Bike stand (optional, makes work easier)
- Clean rag
- Gloves (to keep hands clean and safe)
Visual references help you identify these tools. Check your bike manual or reliable bike websites for tool pictures.
When to Adjust vs. When to Replace Brake Pads
Adjust your brakes if you notice weak braking, squealing, or pads rubbing the rim or rotor. Replace brake pads when they are less than 3mm thick or show deep grooves. Check your pads regularly for wear and damage.
How to Adjust Rim Brakes on Your Bike
Step 1: Inspecting Cables, Pads, and Levers
- Check the brake cables for fraying or rust. Replace them if needed.
- Squeeze the brake levers. They should feel firm, not spongy or loose.
- Inspect the brake pads. Make sure they are not too thin or uneven.
Step 2: Aligning and Centering Brake Pads
- Loosen the bolt holding a brake pad with a hex wrench.
- Align the pad so it touches only the rim, not the tire or falling below the rim edge.
- Adjust the pad so it sits parallel to the rim.
- Hold the pad in place and tighten the bolt securely.
- Repeat for the other side.
Step 3: Tightening and Fine-tuning with the Barrel Adjuster
- Locate the barrel adjuster on the brake lever or where the cable enters the brake arm.
- Turn the barrel adjuster counterclockwise to tighten the brake pull (less lever travel) or clockwise to loosen it.
- Squeeze the brake lever and check the brake response. Fine-tune as needed for best feel.
Step 4: Troubleshooting Common Rim Brake Issues (Squeal, Rubbing, Weak Stopping)
- Squeal: Try toeing-in the pads slightly—the front edge touches the rim first.
- Rubbing: Center the brake arms using the small screws near the pivot points.
- Weak stopping: Replace pads or tighten cables as described above.
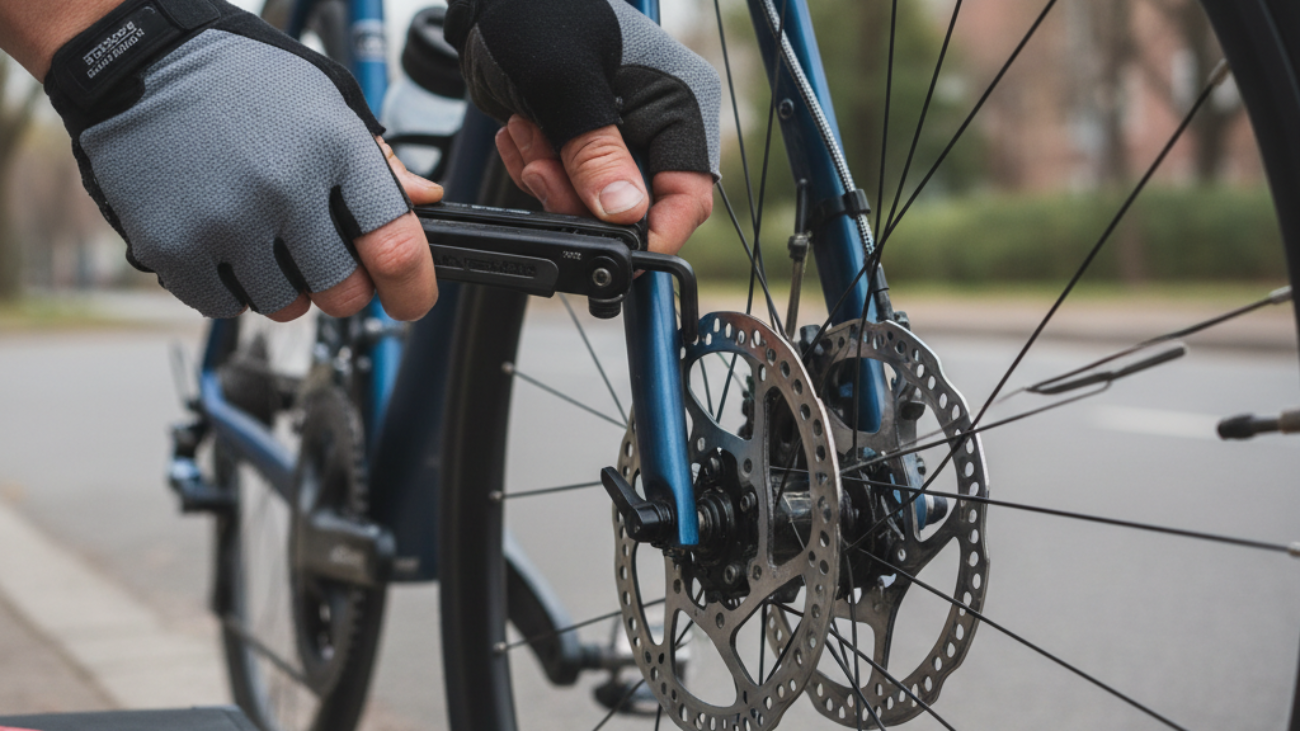
How to Adjust Mechanical Disc Brakes
Step 1: Checking Rotor and Pad Wear
- Spin the wheel and watch the rotor for wobbles. If bent, gently straighten it with your hands or a rotor truing tool.
- Check brake pad thickness. Replace if less than 1mm.
Step 2: Caliper Centering and Pad Clearance Adjustment
- Loosen the two bolts holding the brake caliper to the frame or fork.
- Squeeze the brake lever so the pads clamp the rotor. This centers the caliper.
- Tighten the caliper bolts while holding the lever.
- Spin the wheel. Pads should not rub. If they do, gently tap the caliper until it stops rubbing, then retighten bolts.
Step 3: Adjusting Cable Tension and Lever Feel
- Find the barrel adjuster on the lever or caliper.
- Turn it to fine-tune lever travel and pad engagement.
- If there is still slack or weak stopping, use a hex wrench to loosen the cable anchor bolt, pull the cable tighter, and retighten the bolt.
Step 4: Diagnosing and Fixing Common Problems
- Spongy lever: Check cable tension and replace stretched cables if needed.
- Rubbing pads: Re-center the caliper.
- Poor stopping: Replace worn pads or clean the rotor with rubbing alcohol.
How to Adjust Hydraulic Disc Brakes (2024 Update)
Step 1: Identifying Hydraulic Brake Components
- Master cylinder (brake lever)
- Brake hoses
- Brake caliper and pads
- Rotor
Look for “hydraulic” labels or fluid reservoirs. Hydraulic brakes don’t use cables.
Step 2: Adjusting Pad Contact and Lever Travel
- Many hydraulic levers have a small adjustment knob or screw. Turn to set how far the lever moves before braking starts.
- If you want closer pad contact, adjust according to your brake manufacturer’s instructions.
Step 3: When and How to Bleed Hydraulic Brakes
- Bleed the brakes if the lever feels spongy or pulls to the bar with little stopping power.
- Follow your brake brand’s guide for the right fluid and technique.
- Typical steps: Attach a bleed kit, pump fluid through, remove air bubbles, and refill.
If unsure, ask a bike mechanic to bleed your brakes.
Step 4: Dealing With Squealing, Rubbing, and Spongy Brakes
- Squealing: Clean the rotor and pads with isopropyl alcohol and roughen pads with sandpaper.
- Rubbing: Re-center the caliper following earlier steps.
- Spongy brakes: Bleed the system to remove air.
Bike-Specific Brake Adjustment Tips
Road Bikes: Precision and Brake Modulation
- Keep brake pads close to the rim but not rubbing. Aim for a firm, responsive lever feel.
- Use high-quality pads for better control.
Mountain Bikes: Power, Trail Debris, and Mud
- Check brake pads and rotors often. Debris can wear them out quickly.
- Aim for maximum stopping power—adjust for slightly more pad-to-rim or pad-to-rotor contact.
Hybrid and E-Bikes: Everyday Reliability and Safety
- Check brakes each week for smooth, reliable stopping.
- Adjust for steady braking even in wet weather.
Advanced Troubleshooting and Maintenance
Resolving Brakes That Won’t Center or Continue to Rub
- Use centering screws (rim brakes) or tap the caliper (disc brakes).
- Check for bent parts or dirty pivots and clean or replace as needed.
Identifying Uncommon Brake Noises and Solutions
- Grinding: Debris caught in pads—remove and clean.
- Clicking: Check for loose bolts and tighten all fittings.
Simple Checks Before Every Ride
- Squeeze both brake levers hard. Check for firmness.
- Spin each wheel. Ensure pads don’t rub or feel weak.
- Check visually for pad wear and cable or hose damage.
Visual Guide: Illustrations and Video Resources
For detailed visuals, consult your bike’s manual or use trusted resources such as:
- Park Tool (parktool.com) brake adjustment videos
- GMBN Tech (YouTube channel for Mountain Bikes)
- Sheldon Brown’s website for detailed bike diagrams
Frequently Asked Questions About Bike Brake Adjustment (2024)
- How often should I adjust my bike brakes? Check them every month, or more often if you ride regularly.
- Can I mix different types of brake pads? Only use pads designed for your specific brake system.
- What if I’m unsure about a repair? Visit a certified bike mechanic for help.
References and Further Reading
- Park Tool: Brake Service and Adjustment Guides
- Sheldon Brown: Brake Types Explained
- Bicycle manufacturer manuals (Trek, Giant, Specialized, etc.)
- GMBN Tech tutorials
- Bicycling Magazine brake repair articles