
Why and When You Should Change Your Bike Pedals
Common Scenarios and Performance Benefits
Changing your bike pedals can improve your ride and keep you safe. Many riders change pedals to get better grip, lighter weight, or a new riding style, or when upgrading their bike. If you ride on rough trails, commute daily, or want to try clipless pedals for more speed, swapping pedals can make a big difference.
Signs Your Pedals Need Replacement
- Your pedals spin unevenly or make grinding sounds.
- You notice cracks, loose parts, or damaged reflectors on your pedals.
- Your shoes often slip off the pedals.
- The pedal thread is damaged.
- Pedals cannot be tightened or stay loose.
Essential Tools and Preparation for Changing Bike Pedals
Pedal Wrenches, Allen Keys, and Grease Explained
- Pedal Wrench: A thin, long wrench (usually 15mm) to fit pedal flats.
- Allen Key Set: Most modern pedals use a hex key (normally 6mm or 8mm).
- Grease: Prevents pedals from seizing and protects threads.
- Rag or Paper Towels: To clean old grease or dirt.
- Gloves: Optional, keeps your hands clean.
Eco-Friendly Grease and Sustainable Practices
Choose plant-based or biodegradable grease to protect the environment. Use reusable tools and dispose of old pedals at recycling centers. Keeping your tools in good shape and cleaning up after maintenance reduces waste.
QR Code: Video Demo of Tool Setup
Scan this code or visit the included link to watch a video showing the correct way to set up all tools before you begin.
Understanding Pedal Types: Flat, Clipless, and Hybrid
Key Differences and Which Type Suits Your Bike
- Flat Pedals: Easy to use. Great for beginners, city riding, and BMX.
- Clipless Pedals: Shoes click into the pedal. Best for road cycling and racing.
- Hybrid Pedals: One side flat, one side clipless. Popular on commuter and gravel bikes.
Pedal Selection Advice for Road, Mountain, and E-Bikes
- Choose flat or hybrid pedals for casual riding or mixed terrains.
- For road and racing bikes, clipless pedals offer more power and efficiency.
- Mountain bikes need pedals with a strong grip for rough trails.
- E-bikes benefit from wide, sturdy pedals for stability.
Step-by-Step Instructions: How to Remove and Install Bike Pedals
Step 1 — Prepare Your Workspace and Protect Your Frame
- Find a clean, well-lit area with enough space to move.
- Lean your bike against a wall, or use a bike stand for stability.
- Place a rag or cardboard under the bike to catch any dirt or grease.
- If needed, wrap the crank arms with a soft towel to prevent scratches while working.
Step 2 — Identifying Right vs Left Pedal Threads
- The right pedal (drive side, with the gears) has a standard thread. Turn it counterclockwise to remove.
- The left pedal (non-drive side) has a reverse thread. Turn it clockwise to remove.
- Check your new pedals—look for “L” (left) or “R” (right) markings near the threads.
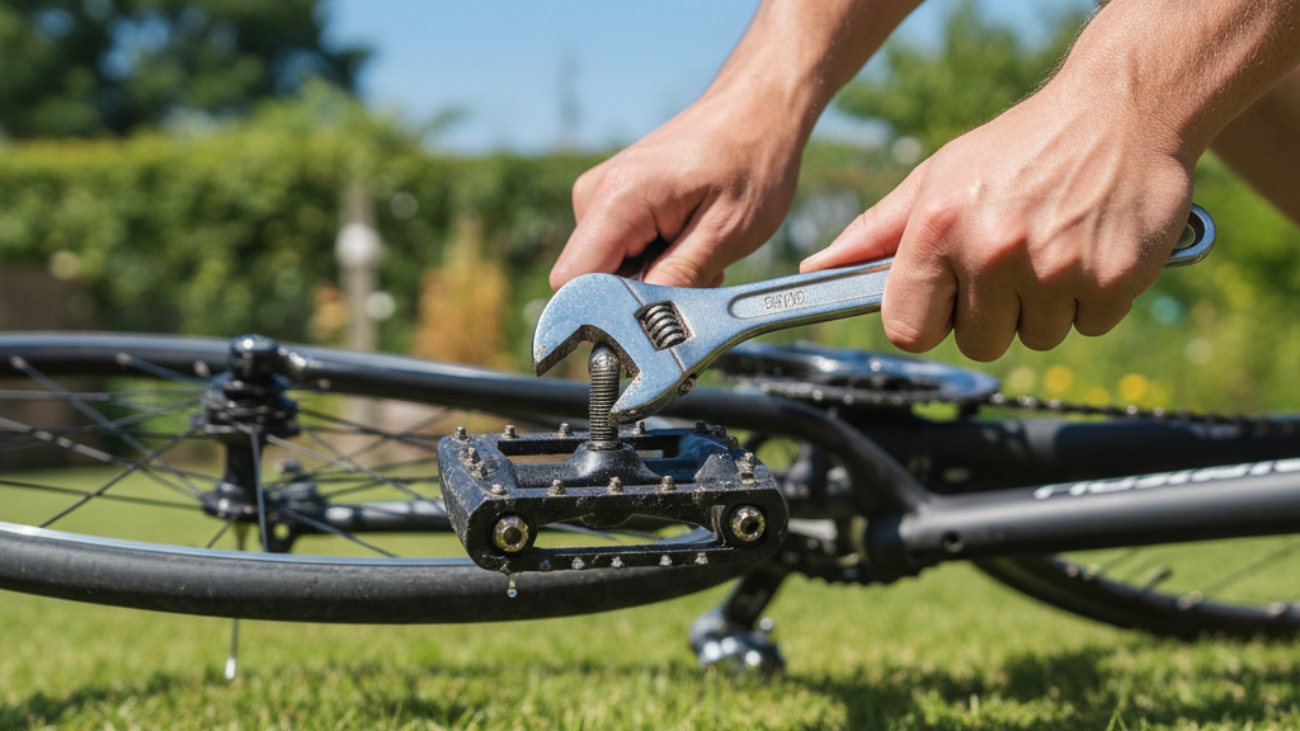
Step 3 — Removing Old Pedals (Flat, Clipless, Hybrid)
- Locate the crank arm and find the flat surface or hex socket on the pedal axle.
- Attach your pedal wrench or Allen key.
- Hold the opposite crank for stability.
- Turn the wrench:
- Right pedal: turn to the left (counterclockwise).
- Left pedal: turn to the right (clockwise).
- If it’s tight, use steady pressure. Don’t jerk or use a hammer.
- Remove the pedal from the crank arm.
Step 4 — Cleaning and Greasing the Crank Threads
- Wipe the pedal threads and crank threads clean with a rag.
- Check for any damage.
- Apply a small amount of eco-friendly grease to the crank threads.
Step 5 — Installing New Pedals: Techniques for Each Pedal Type
- Start each pedal by hand, turning gently so you don’t cross-thread the crank.
- Remember:
- Right pedal: turns to the right (clockwise) to tighten.
- Left pedal: turns to the left (counterclockwise) to tighten.
- Once hand-tight, use your pedal wrench or hex key to fully tighten.
- For clipless or hybrid pedals, check the instructions—they may have different bolt sizes or torque requirements.
Step 6 — Final Safety Checks and Test Ride
- Double-check that both pedals are secure and not cross-threaded.
- Spin each crank arm and listen for unusual noises.
- Wipe away extra grease and clean your workspace.
- Put on your helmet, test ride your bike around a safe area. Check if the pedals feel sturdy and smooth.
Advanced Tips, Troubleshooting & Safety
How to Remove Stuck or Seized Pedals
- Spray a small amount of penetrating oil on the pedal threads. Let it soak in for 10–15 minutes.
- Use a longer wrench for better leverage.
- If still stuck, ask for help at a bike shop to avoid damaging the crank arm.
Common Mistakes Beginners Make (and How to Avoid Them)
- Cross-threading pedals: Always start by hand and never force the threads.
- Mixing up left and right pedals: Remember the threads turn in opposite directions.
- Not using grease: This can make pedals hard to remove in the future.
Torque Settings and Thread Protection Best Practices
- Use a torque wrench if you have one. Most pedals require 30–40 Nm (check your bike manual).
- Do not over-tighten—this can damage the crank arms.
- Grease protects against rust and seizing.
Specialized Tips for E-Bikes, Gravel, and Mountain Bikes
- E-bike pedals may be larger for extra grip—check the size matches your crank.
- Gravel and mountain bike pedals often have pins or clips. Make sure everything is tight before extreme rides.
Video Resources and Visual Guides
QR Code and Link Directory for Instructional Videos
To see these steps in action, scan the QR code or visit our recommended video playlist. Each video shows pedal removal, installation, and common tips for beginners.
Step Illustrations and Mnemonics for Thread Direction
- Remember: “Righty-tighty” on the right, “Lefty-loosey” for removal; on the left, “Lefty-tighty” to install, “Righty-loosey” to remove.
- Tip: Point the wrench toward the back of the bike when loosening pedals.
Glossary: Pedal and Crank Terminology for Beginners
| Term | Meaning |
|---|---|
| Crank Arm | The metal arm that connects the pedal to the bike frame |
| Pedal Axle | The center shaft of the pedal that threads into the crank |
| Thread | The ridged part on the pedal axle that screws into the crank |
| Torque | Turning force used for tightening or loosening parts |
| Clipless Pedal | A pedal type where special shoes attach to the pedal for more control |
| Hybrid Pedal | A pedal with one flat side and one clipless side |
Frequently Asked Questions About Changing Bike Pedals
What If My New Pedals Don’t Fit?
Check the thread size and type. Most bikes use a 9/16-inch thread, but some kids’ bikes use 1/2-inch. If threads are damaged, ask a bike shop for help.
How Often Should Pedals Be Changed?
Replace pedals if they are worn, damaged, or every 2–3 years for active riders. Grease and check pedals each season for best performance.
Can I Mix Pedal Types on the Same Bike?
Yes, but it’s best to match pedal types for safety and balance. Some riders use a clipless pedal on one side and a flat on the other for commuting. Make sure your shoes fit both types if you mix them.
Further Reading and Maintenance Checklist for Cyclists
- Clean and grease pedal threads every few months.
- Check pedals for damage after big rides or if your bike falls.
- Upgrade pedals if you change your riding style or bike type.
- Read more on bike maintenance and safety for all skill levels.
Now you know how to change your bike pedals safely and confidently. Regular pedal maintenance keeps your ride smooth and your cycling adventures fun. Ready to try a new type of pedal or teach a friend? Keep this guide as your reference on your cycling journey!