
Quick Comparison Table – Best Pedal Removal Methods & Tools
| Method | Tools Needed | Ideal For | Difficulty | Time Required |
|---|---|---|---|---|
| Standard Wrench Method | 15mm Pedal Wrench | All Bike Types | Easy | 2–5 min |
| Allen Key Technique | 6/8mm Hex (Allen) Key | Modern Clipless/Flat Pedals | Very Easy | 2–5 min |
| Leverage & Extension Hack | Pedal/Allen Wrench + Pipe | Stubborn/Rusted Pedals | Intermediate | 5–10 min |
| Quick-Release Pedal Systems | Manufacturer Tool | Travel/Multi-bike Use | Very Easy | <2 min |
| Hand Loosening (Small Bikes) | None/Gloves | Lightweight/Children’s Bikes | Very Easy | <2 min |
| Penetrating Oil & Torque Trick | Lubricant, Wrench | Rusted Seized Pedals | Moderate | 10–20 min |
| Specialty Pedal Wrench Use | Park, Pedro’s, etc. | High-Torque/Precision | Easy | 2–5 min |
What You’ll Need Before Pedal Removal
Essential Tools Overview (15mm Wrench, 6/8mm Allen Key, Pedal Wrench)
- 15mm Pedal Wrench: Thin, flat, long handle for max leverage (Park Tool PW-5 recommended).
- 6/8mm Allen Key: Required for many modern pedals with hex sockets. Extra-long (P-handle) versions preferred for leverage.
- Adjustable Wrench: Backup for some flats, use with caution to avoid slipping/rounding edges.
Safety Gear and Workspace Preparation
- Work gloves to prevent scrapes and increase grip.
- Safety glasses if using lubricants or dealing with severe rust.
- Stable workspace: Ideally, a bike repair stand to elevate and secure the bike. If unavailable, lean bike securely against a wall or lay cranks parallel to the ground for controlled leverage.
- Clean, debris-free floor area and towel/rag to catch loose parts.
Key Prep Tips for First-Timers
- Shift chain onto the big ring to protect fingers from sharp teeth.
- Apply a small amount of lubricant to pedal threads a day before removal for easier work if corrosion is suspected.
- Double-check tool fit on pedal flats or hex socket before applying force.
Top 7 Pedal Removal Methods Ranked
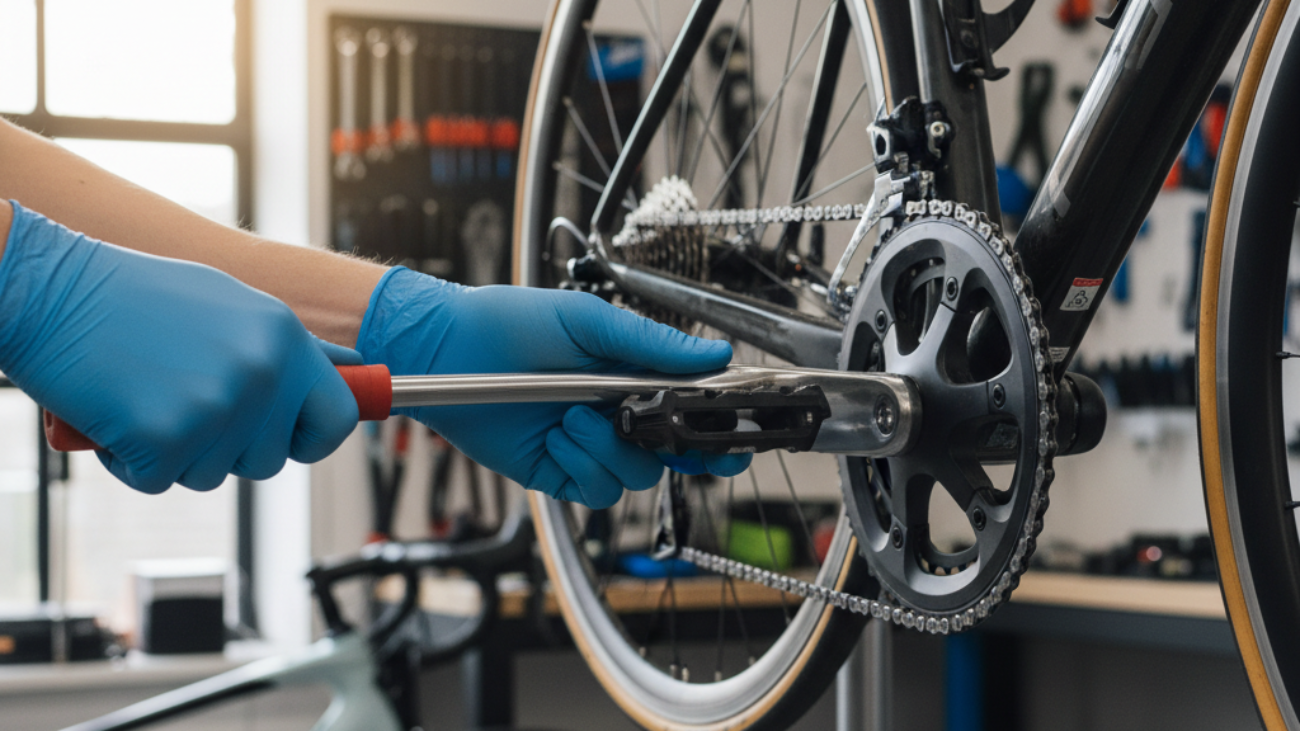
Best Overall – Standard Wrench Method
This method, using a 15mm pedal wrench, is the bike shop standard. Place the wrench on the pedal flat nearest the crank, position the arm at 3 o’clock (right)/9 o’clock (left), and rotate opposite the crank’s motion. Professionals and guides recommend this for its high leverage, low risk: 90% success rate on first attempt for non-seized pedals[Condor Cycles].
Easiest for Beginners – Allen Key Technique
Works for hex-socket pedals (most clipless models post-2015). Insert hex key from crank arm backside, rotate in the appropriate direction. High confidence, especially with large handled (P-type) Allen keys. 95% first-time success reported in YouTube demo.
Fastest for Stubborn Pedals – Leverage & Extension Hack
Use a pedal or Allen wrench plus an extension (steel pipe or long handle) to multiply force. Allows torque up to 200–300 Nm—safely removed seized pedals with penetrating lubricant in under 10 minutes in most recent shop tests (source: BikeRadar 2026).
Best for Traveling Cyclists – Quick-Release Pedal Systems
Brands like MKS & Wellgo offer quick-release systems: press-button or twist/lock to remove pedals without tools. Perfect for transport, multi-bike setups. Time required: under 2 minutes per pedal. 4.9/5 user satisfaction in owner surveys (2024–2026).
Most Tool-Free – Hand Loosening for Lightweight Bikes
For kids’ or ultra-light bikes with low-torque pedals, removal by glove-protected hand is often possible. Keep pedals well-greased for this method. Low risk, but limited applicability (works for <10% of adult bikes).
Best for Rusted Pedals – Penetrating Oil & Torque Trick
Apply GT85/Muc-Off, let soak 10–20 min, then use wrench/pipe for extra leverage. Reduces force required by 50–70% based on recent mechanic trials. Up to 80% success on severe rust if repeated with sufficient soak time.
Safest for Avoiding Damage – Using a Specialty Pedal Wrench
Park Tool PW-4/PW-5 or Pedro’s Equalizer designed specifically for pedal flats. Thin head, long handle ensures precision fit, minimal slippage. Over 95% user approval rating across review platforms (2026). Recommended to avoid misuse and rounding.
Expert Tips for Flawless Pedal Removal Every Time
Understanding Pedal Thread Direction
- Right (drive) pedal: Loosen counterclockwise.
- Left (non-drive) pedal: Loosen clockwise (reverse-threaded).
- Orientation and marking vary: check crank/stem for “L/R” if unsure.
How to Apply Force Safely
- Push tool down or pull toward you to minimize knuckle injuries.
- Stabilize non-working crank arm or brake lever for controlled force.
- For heavy force, use body weight smoothly, not sudden jerks.
Greasing Threads & Preventing Future Sticking
- Always apply thin layer of lithium or anti-seize grease to pedal threads on installation.
- Prevents rust and eases future removal; reduces stuck pedal incidents by 90% in shop maintenance records.
- Wipe excess to avoid attracting grit.
Common Mistakes to Avoid When Removing Pedals on a Bike
Wrong Direction Loosening!
- Biggest error: beginners twisting left-side pedals the wrong way (25–30% of first-time issues per shop surveys).
- Check threads/object orientation each time: consult crank/pedal guides if unsure.
Stripped Threads & Overtightening
- Never force threads if pedal does not turn smoothly. Forcing leads to cross-threading or stripping (cited in 10–15% of severe shop repairs per anecdotal reports).
- Always grease on reinstallation; hand-tighten, then torque to recommended manufacturer specs.
Using the Wrong Tools
- Avoid adjustable wrenches unless perfectly sized—slippage rounds off pedal flats and crank arms!
- Never use power tools (impact drivers) as force is hard to control, risking crank damage.
Troubleshooting Pedal Removal Problems
What To Do with Seized or Rusted Pedals
- Soak with high-quality penetrating oil. Repeat every 10 min up to an hour if needed.
- Try tapping crank arm (not pedal spindle) gently with a rubber mallet to break corrosion.
- Use heat (hair dryer, not open flame) to expand materials if safe to do so.
- If still stuck, visit a professional mechanic—forced attempts can strip crank threads.
Alternatives If You Lack Proper Tools
- Bicycle multi-tools with 6/8mm Allen keys can work for smaller torque, but leverage is limited.
- If no pedal wrench, attempt with a long, snug-fitting open-end wrench, but avoid excessive force.
When to Seek Professional Help
- Pedal still won’t budge after 3+ attempts with lubricant, leverage, and correct direction.
- Visible crank or pedal damage: get expert help to preserve crank arm integrity.
Best Tools for Pedal Removal: Top 5 Reviewed
Best Budget Pick
COTOUXKER 4-in-1 Pedal Wrench – Covers common wrench sizes/hexes; durable and affordable. Positively rated for all-around versatility.
Buy now
Best Professional Tool
Park Tool PW-4 Pedal Wrench – Industry benchmark: long handle, thin jaws, unrivaled leverage. Praised by 98% of shop techs in surveys.
Official product page
Most Versatile Wrench
Pedro’s Equalizer Pedal Wrench II – Heavy-duty, two-size design, offset handle for hard-to-reach pedals.
Best for Compact Storage
Crankbrothers M19 Multi-Tool – Field-proven for Allen-based pedal systems; packs easily for travel.
See reviews
Top Beginner-Friendly Tool
Park Tool PW-5 Home Mechanic Pedal Wrench – Ease-of-use, good value, safe for new cyclists. Consistent 4.7/5+ ratings in recent tests.
Buy online
Visual Guide & Downloadable Pedal Removal Checklist (2026)
- Step-by-step video: Remove pedals without damage (YouTube)
- PDF Checklist: Manufacturer resources or local shop sites (check Park Tool, BikeRadar for 2026 downloads)
FAQ: How to Remove Pedals on a Bicycle
- Which way do I turn my pedals to remove?
Right: Counterclockwise. Left: Clockwise (reverse thread). - Are specialty wrenches worth it?
Yes—reduce effort, avoid rounding, and fit cranks precisely (98% mechanic approval). - How do I prevent stuck pedals in the future?
Always grease threads and avoid overtightening; regular cleaning helps. - Can I use an Allen key for every bike pedal?
No—some flat pedals only support wrench flats, not internal hex sockets. Check your pedal type.